Environment
Retain
Exchange 2007, 2010, and 2013
Office 365
Exchange Module Setup
Situation
Resolution
Exchange connects email clients (i.e., Outlook or third party applications like Retain) via a method they call "autodiscover". This article will provide an overview of how autodiscover works so that the reader can understand the configuration steps that it requires, which are also outlined in this article. It is important for the reader to understand that the required setup is not dictated by GWAVA, it is required by Microsoft for all clients that connect to their Exchange systems.
HOW RETAIN CONNECTS TO YOUR EXCHANGE MAILBOXES - THE AUTODISCOVER PROCESS
Microsoft has provided it's own Autodiscover API that third party developers can use if they wish or a third party developer can write its own implementation. Retain versions prior to 3.5 used GWAVA's own implementation of the Autodiscover API using the specs provided by Microsoft. In Retain 3.5, we replaced that with Microsoft's Autodiscover API called EWS Managed API. Here is a link that provides an overview of how it works, which was adpated from Microsoft's own Autodiscover for Exchange technical document: "Autodiscover: How Connects to Your Exchange Mailboxes".
PREPARATORY STEPS
1. Configure the Retain Worker server's primary DNS server.
It must be the same DNS server as the primary DNS server configured for each of your CAS servers.
If you do not do this, the Exchange Autodiscover process will fail. You may also want to flush the DNS cache on the Retain Worker server if you have made a change to the primary DNS server setting. The same would apply to each of the CAS servers.
If your Retain server and your Exchange servers cannot point to the same DNS for some reason (separate networks, for example), see "How to Make Exchange's Autodisover Work When Retain and Exchange Point to Different DNS Servers".
2. Create the "retain" user account in Exchange (with the Exchange impersonation role assigned).
This account must have the impersonation role assigned to it. Impersonation roles allow access to all other mailboxes within the system. This account must have the following qualities:
a) Full read rights to Active Directory.
Needs to see all other users, groups, resources, and Exchange servers in the Exchange Forest.
b) Be a mailbox-enabled user.
c) Must be in UPN format (user principal name).
For the sake of those customers who had someone else set up their Exchange system and are not very familiar with Exchange, the UPN is the Active Directory user object name that the user logs in with. It is often in the format of user@domain.local, but can be user@domain.com, user@domain.gov, etc. It's just important to understand that it is a DIFFERENT field in the user information from the Exchange email address.
As mentioned, the UPN and the user email address can be the same string (again, different fields though) like retain@company.com, but we also have seen plenty of customers where the UPN is retain@company.local and the email address is retain@company.com.
d) Must NOT be a member of any Exchange Administrator group.
Exchange denies impersonation rights for all administrator accounts.
3. Grant the new "retain" account the impersonation role.
Exchange 2013
a. Log on to the Exchange admin center, click on "recipients" in the navigation pane on the left, and click on the plus (" + ") to create a new user mailbox.
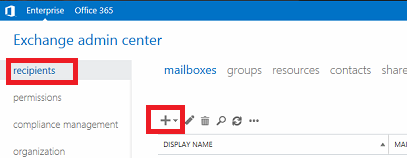
b. Complete the new user mailbox dialog and save the changes.
.png)
c. Back at the Exchange admin center, click on "permissions" and then click on the plus (" + ") sign to create a new admin role group.
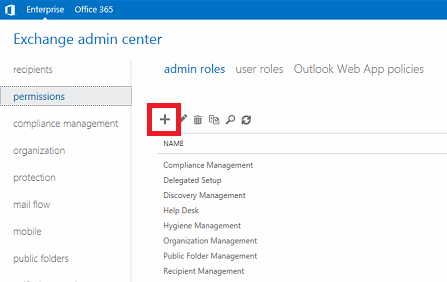
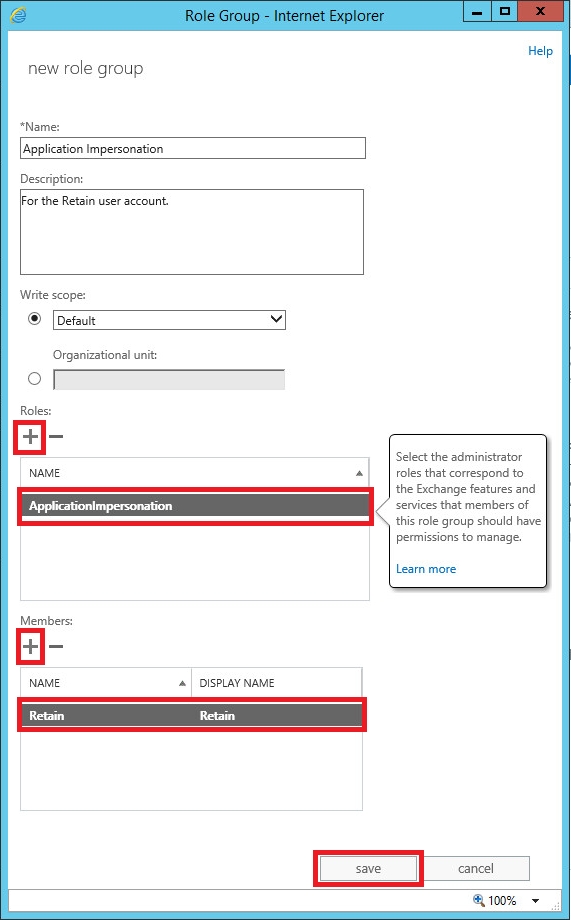
d. Complete the fields for the new role group. Give the role group a descriptive name that identifies the roles it contains. In this case, we are using it for the impersonation account.
BEFORE and AFTER:
![]()
Exchange 2010
You first create a mailbox account in Exchange. We recommend calling it "Retain" because it is easy to recognize; however, you may name it as you wish. Just remember, this mailbox account cannot be a member of any group that has administrator privileges - Microsoft does not allow impersonation for mailboxes with admin rights.
Next, you run a Powershell command. To do this, you must be logged in on a Windows workstation or server when admin rights to Active Directory. The command that will do three things:
- Create a new management role assignment. You'll be assigning a name to the new role. Again, the name does not matter, but using a name that indicates what it is makes it easier for everyone - something like "impersonation-retain".
- Assign the "ApplicationImpersonation" role to that management role.
- Assign your new "Retain" mailbox account to this management role. This is what gives the account impersonation rights.
Before you can do this, you must have the appropriate cmdlets for Powershell. Cmdlets are add-on Powershell language objects geared towards specific tasks. It's loosely analogous to have an English dictionary and adding a medical terms module to it.
Once you have installed the necessary cmdlets, type the following at a command window on a Windows machine where you are logged in with the sufficient administrator rights to Active Directory:
New-ManagementRoleAssignment –Name [Impersonation Assignment Name] –Role ApplicationImpersonation –User [Service Account]
Where the "Impersonation Assignment Name" is the name you want to assign to the new management role (it can be name whatever you wish - an object always needs a label/name) and the "Service Account" is the name of the Retain mailbox account you created to which you wish to grant impersonation rights.
Example:
New-ManagementRoleAssignment –Name impersonation-retain -Role ApplicationImpersonation -User Retain
If additional Exchange servers are added to the system after running this command to grant rights to the "retain" user, the command must be run again to grant rights to the new server.
Exchange 2007
You first create a mailbox account in Exchange. We recommend calling it "Retain" because it is easy to recognize; however, you may name it as you wish. Just remember, this mailbox account cannot be a member of any group that has administrator privileges - Microsoft does not allow impersonation for mailboxes with admin rights.
Then, you must open up Powershell to issue some commands - Exchange 2007 requires three commands. Type the following at a command window on a Windows machine where you are logged in with the sufficient administrator rights to Active Directory. Each command should be on one line (each line may wrap in your browser window as you read this).
In theses examples, "Retain" is the name of the mailbox account of the Retain user or "Service Account":
Get-ClientAccessServer | Add-AdPermission -User Retain -ExtendedRights ms-Exch-EPI-Impersonation
Get-MailboxDatabase | Add-AdPermission -User Retain -ExtendedRights ms-Exch-EPI-May-Impersonate
Get-MailboxServer | Add-ADPermission -User Retain -ExtendedRights Send-As, Receive-As, ms-Exch-Store-Admin
4. Grant the new Retain impersonation account delegation rights to any shared mailboxes, room or equipment accounts in Exchange that you wish to archive.
For more information, you can reference the following:
2007: "Add-MailboxPermission (RTM)"
2010 and 2013: "Exchange Setup for Archiving Shared Mailboxes, Rooms, and Equipment"
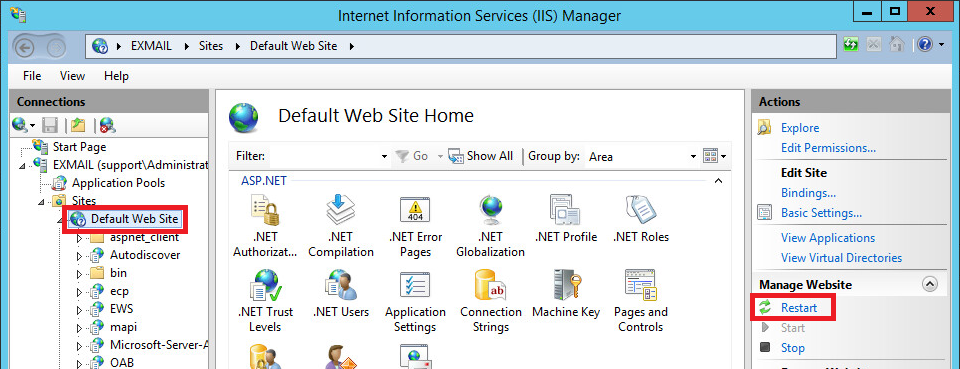
5. Enable Basic Authentication on EWS and Autodiscover on each CAS server.
Without this, Retain will not be able to connect to the mailboxes. There is no workaround to this. In Exchange 2013, this can be done within the Exchange admin center or it can be done on each CAS server in IIS Manager. For Exchange 2010 and 2007, this can only be done in IIS Manager on each CAS server as follows:
a. Open IIS Manager, expand "Sites", expand "Default Web Site", and highlight Autodiscover; then, in the middle pane, double-click on "Authentication" as shown:
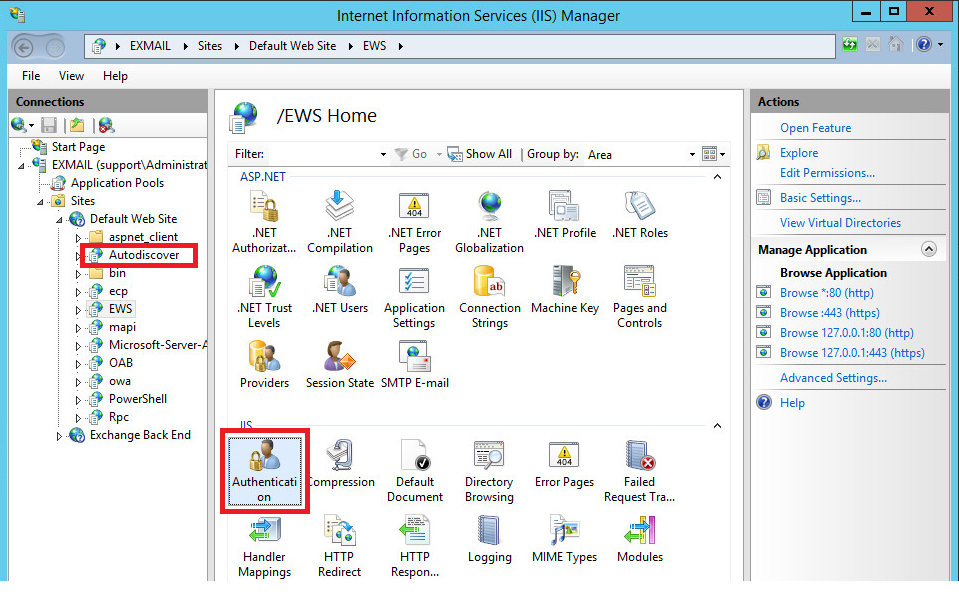
b. If "Basic Authentication" has a status of "Enabled", then no changes are necessary; otherwise, under "Actions" (third pane), click on "Enable".
.png)
c. Follow the same steps for EWS.
d. Restart the Default Web Site. NOTE: This could interrupt user connects to Exchange, so you may want to do this during non-production hours.
6. Other Exchange considerations:
a. Firewall/proxy exceptions: Retain needs to be able to connect to Exchange's EWS service. Make sure that your firewalls and proxies contain an exception to allow TCP traffic to and from the Retain server.
b. IIS settings: Make sure that IIS on the Exchange server is throttled and configured appropriately for use with Retain.
Attachment size limits are a common problem. Click here to access a Technet article that may be helpful in making changes to IIS. The changes you'll want to consider making will be to the Exchange Web Services.
c. EWS throttling: It is recommended to create a throttling policy specifically for the Retain impersonation account to avoid errors.
d. Exchange maintenance. You may want to configure your Retain jobs to avoid the nightly Exchange maintenance if possible.
INFORMATION NEEDED TO SET UP EXCHANGE MODULE
1. DNS name or IP address of a Global Catalog Server .
To see which servers have a copy of the global catalog, launch Active Directory Sites and Services:
a. Expand "Sites".
b. Expand the site container (i.e., "EasyNomad").
c. Expand "Servers".
d. Each server should be listed with a column label "DC Type". If it has a global catalog, it will read "GC" in this field for a given server.
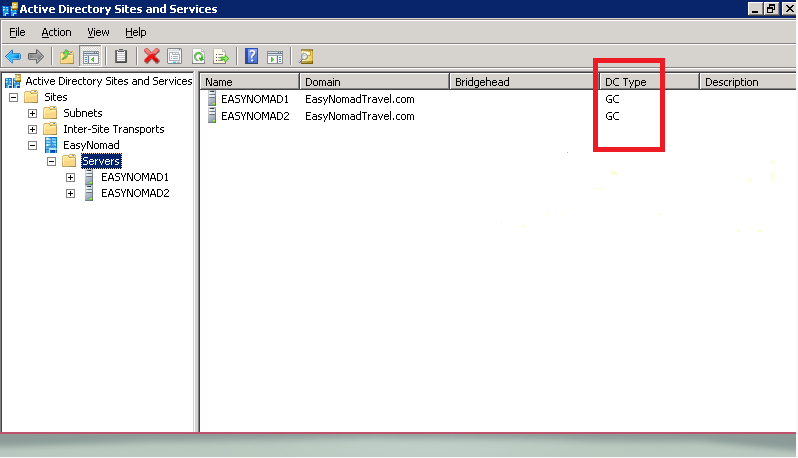
In Retain's Exchange module configuration UI, it is referred to as the Global Catalog Host.
e. You can also use this Powershell command to determine the global catalog host of the domain forest:
Get-ADDomainController -Discover -Service "GlobalCatalog"
2. The Global Catalog port (Microsoft default is 3268 for plain text and 3269 for SSL).
3. A target user email address, which will be used to test the impersonation account setup.
4. The LDAP search base.
This is the LDAP path to the base of where Retain will start searching for valid Exchange users. It has to be in LDAP format. The search base must be at a high enough level to see all Exchange users. An example of a search base might look like this:
dc=xyzcompany,dc=com
or
ou=headquarters,dc=xyzcompany,dc=com,ou
5. The user principal name (UPN) of the Retain impersonation account.
For the sake of those customers who had someone else set up their Exchange system and are not very familiar with Exchange, the UPN is the Active Directory user object name that the user logs in with. It is often in the format of retain@domain.local, but can be user@domain.com, user@domain.gov, etc. It's just important to understand that it is a DIFFERENT field in the user information from the Exchange email address.
As mentioned, the UPN and the user email address can be the same string (again, different fields though) like johndoe@company.com, but we also have seen plenty of customers where the UPN is johndoe@company.local and the email address is johndoe@company.com.
6. The password for the retain user impersonation account.
Once you your Exchange system properly configured - which is the most difficult step in getting archive jobs to run against your Exchange system - you are ready to configure the Exchange Module within the Retain web administration program. This is the simple part. Refer to the "Exchange Module" section of your GWAVA Retain Administration and User Guide for instructions on the module setup if you have any questions on how to complete the fields.