Environment
Windows XP, Vista, 7, 2008 Server
GroupWise 2012 and 2014
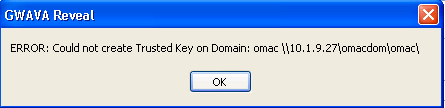
Situation
Resolution
The error means that Reveal was not able to communicate to the GroupWise system and create a trusted application. In earlier versions of GroupWise (GroupWise 7, and 8), firewalls or proxies may stop the connection to the domain directory. Not having proper rights through NDS, or read and write access to the primary domain may also throw this error.
In GroupWise 2012 the Trusted Application process was changed. This means that the connection Reveal used in GroupWise 8 and earlier to create a trusted application cannot be made. To overcome this a trusted application key must be manually created in order for Reveal to connect.
This also works for GroupWise 2014 However, You must use the GroupWise 2012 client on the workstation or server you install Reveal. The GroupWise 2014 client WILL NOT WORK.
To create the Trusted Application Key and allow Reveal to use the generated key, follow these instructions:
GroupWise 2014
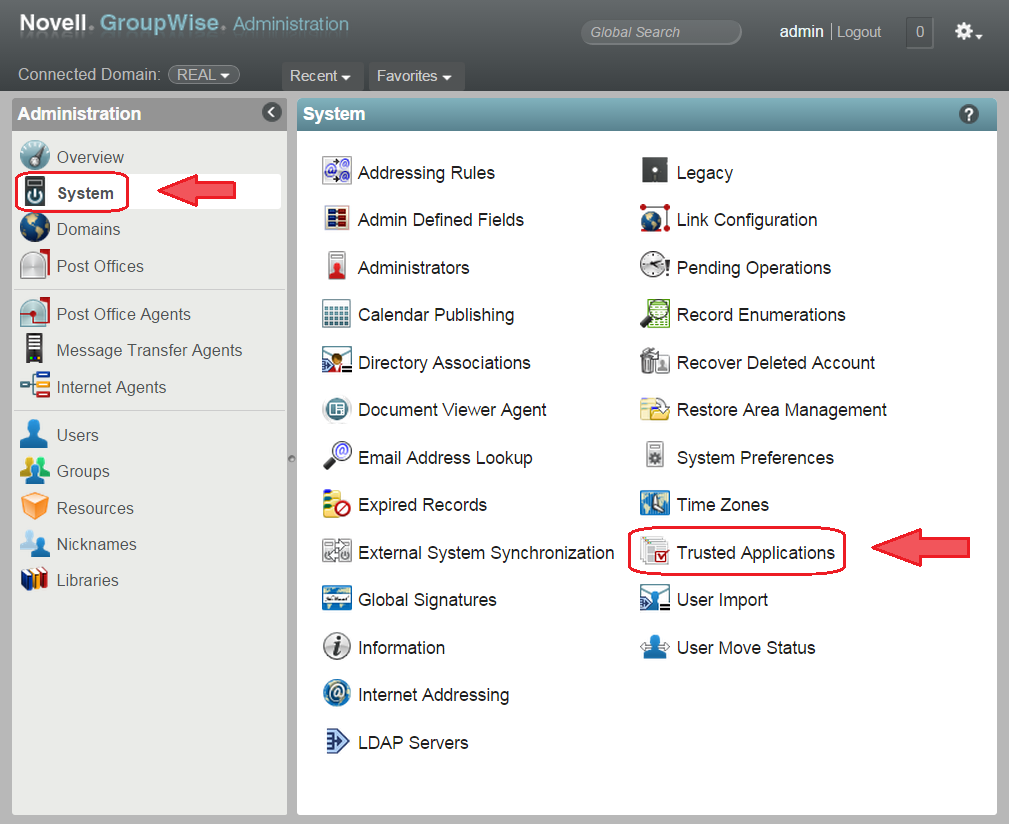
1) Enter the Web management console.
2) Click on System > Trusted Applications. Then click "New" (Link to GroupWise documentation)
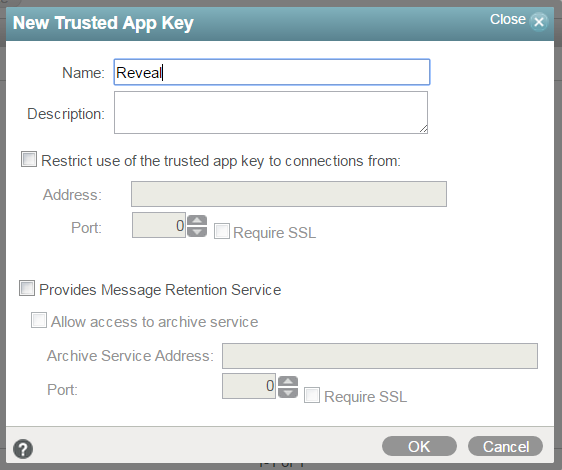
3) Enter in the Trusted Application Name: Reveal. Click OK when finished.
Settings Note: It is not necessary to restrict the use of the key to an ipaddress, or check any of the other boxes to create the Trusted Application. Leave everything as default.
Further Explanation: If you put in an IP address or hostname for the Trusted Application Key you will be limited to connecting to GroupWise from that location. If you have to: re-install Reveal, move Reveal to a new workstation or new server you would have to change or re-create the trusted key.
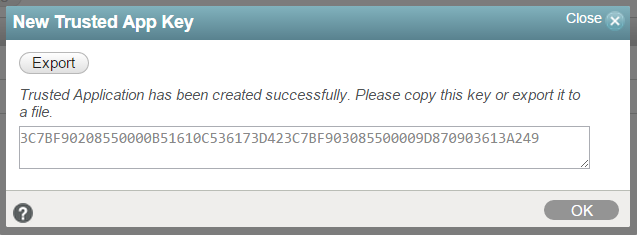
The Trusted Application Key will then be displayed on screen. Copy this to a text file on the workstation or server where you've installed Reveal.
4) Download this file: Reveal Fix. This file contains two important files that will be needed. The first one is a new Reveal.exe file. The second is a new reveal.ini file.
5) Copy the Reveal.exe file to the Reveal application directory and replace it with the current one. The default location for Reveal is found here: C:\Program Files(x86)\GWAVA\GWAVA Reveal.
6) Copy the reveal.ini file into the primary domain directory. Replace it with the current one if it exists.
Settings Note: Create a mapped drive from the Windows box to the primary domain directory. If the domain is on Linux a SAMBA mount may need to be created in order to do that. Please consult Reveal documentation or Linux documentation to setup SAMBA.
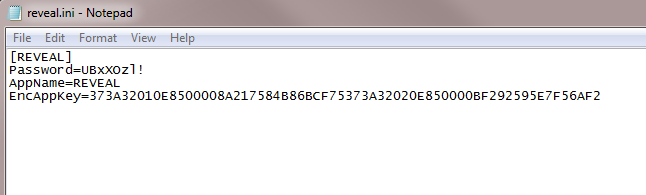
7) Open the Trusted Application Key text file that was created earlier and copy the key. Edit the reveal.ini file and paste the trusted application key after the EncAppKey= line. (No spaces after = ). Make sure the AppName exactly matches what you put as the Trusted application key name. If you named it "Reveal" as demonstrated above you don't need to change this line. Do not change any of the other lines. Save the file.
8) Last step, launch Reveal and it will now be able to connect to the system.
Settings Note: Default password for Reveal is GWAVA (all upper case).
GroupWise 2012
1) Launch ConsoleOne , and connect to the Primary Domain
2) Select the Primary Domain and then in the menu click on Tools | GroupWise System Operations | Trusted Application
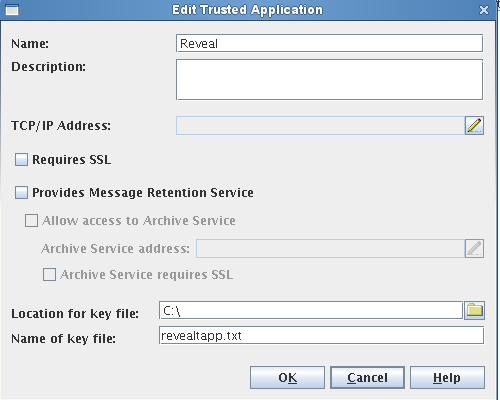
3) Create a Trusted Application Key for Reveal. Enter in the Trusted Application Name: Reveal. Then proceed with choosing a Location for the file, and giving the file Name. Click OK when finished.
Settings Note: It is not necessary to have the ipaddress, or check any of the other boxes to create the Trusted Application. Leave everything as default.
Further Explanation: If you put in an IP address or hostname for the Trusted Application Key you will be limited to connecting to GroupWise from that location. If you have to: re-install Reveal, move Reveal to a new workstation or new server you would have to change or re-create the trusted key.
4) Download this file: Reveal Fix. This file contains two important files that will be needed. The first one is a new Reveal.exe file. The second is a new reveal.ini file.
5) Copy the Reveal.exe file to the Reveal application directory and replace it with the current one. The default location for Reveal is found here: C:\Program Files(x86)\GWAVA\GWAVA Reveal.
6) Copy the reveal.ini file into the primary domain directory. Replace it with the current one if it exists.
Settings Note: Create a mapped drive from the Windows box to the primary domain directory. If the domain is on Linux a SAMBA mount may need to be created in order to do that. Please consult Reveal documentation or Linux documentation to setup SAMBA.
7) Open the Trusted Application Key file that was created earlier and copy the key. Edit the reveal.ini file and paste the trusted application key after the EncAppKey= line. (No spaces after = ). Make sure the AppName exactly matches what you put as the Trusted application key name. If you named it "Reveal" as demonstrated above you don't need to change this line. Do not change any of the other lines. Save the file.
8) Last step, launch Reveal and it will now be able to connect to the system.
Settings Note: Default password for Reveal is GWAVA (all upper case).