Environment
GWAVA 4 / 5
All Supported Operating Systems
Situation
The Post Office has been infected by Viruses and I want to scan the PO for Viruses and delete them.
Resolution
This article is for GWAVA 4 and 5. If you are using GWAVA 6 have a look at following article:
Configuring a GWAVA POA Scanner to delete Viruses from a Post Office
In order to scan a GroupWise post office, there are few things that need to be setup. Prior to setting up the GWAVA post office scanner, IMAP needs be enabled on the post office. This allows access through a Trusted Application key which cannot be done through the IMAP connection on the GWIA. Follow the steps below to prepare the post office to accept a GWAVA POA Scanner.
In general a post office scanner should only be used to search for very specific items where false positives won't happen. A post office scanner reads the messages directly in a user's mailbox and will delete the message if the message matches the criteria you specify in your poa scanner configuration. If you are doing anything other than virus scanning you should quarantine the messages just in case to make sure that you don't accidentally remove mail. The best use of a post office scanner is to scan for viruses inside user mailboxes as will be shown in this article.
Prepare the Post Office
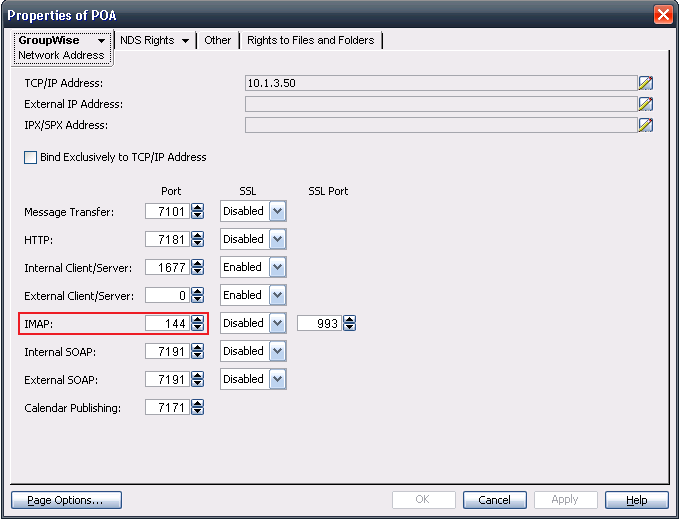
1) Set the IMAP port FIRST. In ConsoleOne, open the properties of the POA (not the post office), and select Network Address, under the GroupWise tab. Set the IMAP port to something other than 143 (this example uses 144), then select Apply, and Close.
This prevents the POA IMAP port from interfering with the GWIA IMAP port if they are on the same server. If they are set to the same port, the POA will unload.
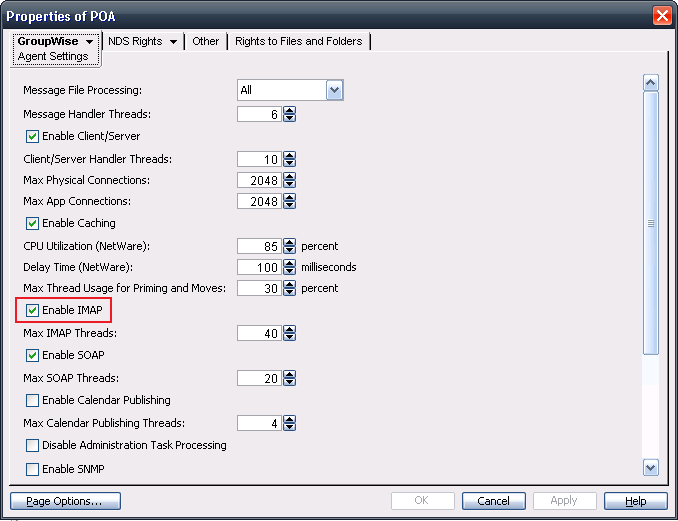
2) Next, switch to the Agent Settings section under the GroupWise tab, and Enable IMAP on the post office.
3) Wait one minute. Test the connection via IMAP by using Telnet. Open a command prompt and type "telnet 10.1.3.50 144". Insert the appropriate IP address and Port.

If the above is setup correctly, the following response should appear. If it does not, there is a problem with IMAP on the server. Do not proceed with GWAVA POA Scanner setup and configuration if there is a problem with IMAP.

For more information on troubleshooting IMAP refer to the following article here. Once you have fixed any issues, please return to this article and set up your POA scanner.
Install a GWAVA POA Scanner
1) Open a web browser and login to the GWAVA Management Console.
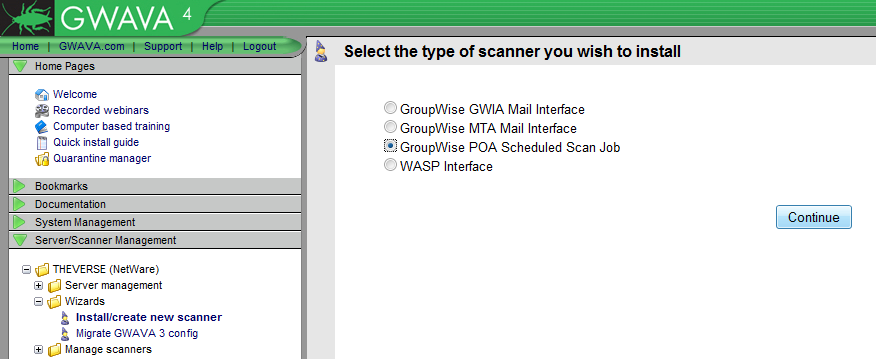
2) Go to the Install Wizard
On the left side, expand the Server/Scanner Management section. Expand the Wizards section, and select Install/create new scanner.3) Select the GroupWise POA Scheduled Scan Job. Click Continue.
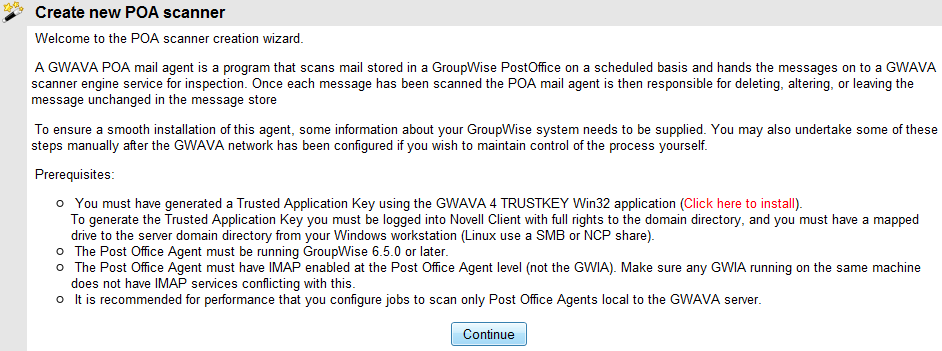
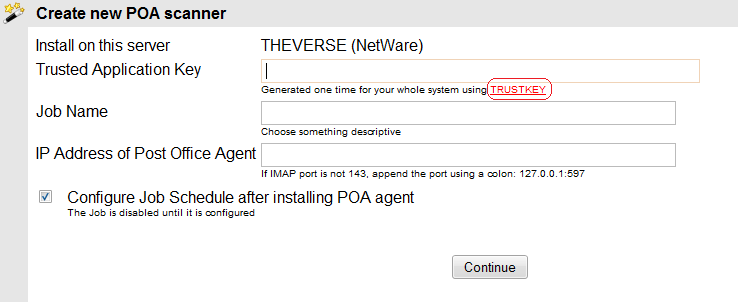
4) Read through the prerequisites. It is not necessary at this point to create the Trusted Application Key. This will be done shortly. Click Continue.
5) Create a Trusted Application Key and enter it in the POA scanner installation.
GroupWise 2012 / 2014:
If you are running GroupWise 2012 or 2014, have a look a following article to create the Trusted App Key:
How to manually create a Trusted Application Key for a GWAVA POA interface
GroupWise 8:
For GroupWise 8 you can use the generator to create the Trusted App key as described in the following steps.
a) Click on TRUSTKEY. This will prompt a download for trustkey.exe. Save the file and run the file. This will install the Trusted Application Key Generator application. Map a drive to the PRIMARY DOMAIN directory. Run the Generator.
NOTE: Do not use any other key generator that may have been obtained from other GWAVA products such as GWAVA Retain. It is a different version and may not be compatible.
b) Browse to the PRIMARY DOMAIN directory. Then click Create Trusted Key.

NOTE: Do not immediately close this dialog. Make sure to copy the key to the clipboard and paste it in the web browser. Once you have continued to the next step, close the key generator application.
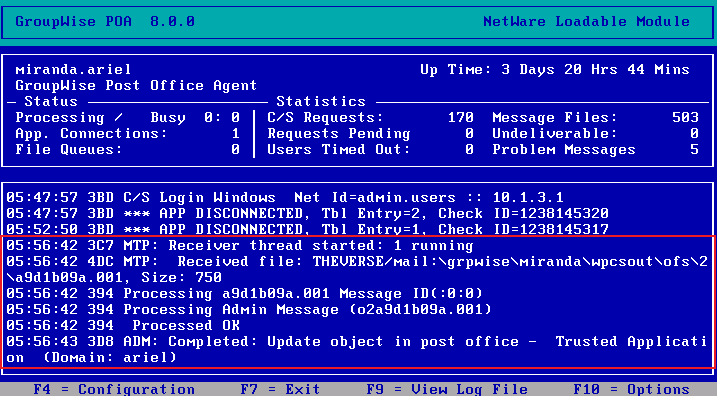
c) Wait at least one minute for the key to filter through the system. Check the POA log for the trusted application acknowledgement, then test. If the test is not successful, do not proceed to the next step.
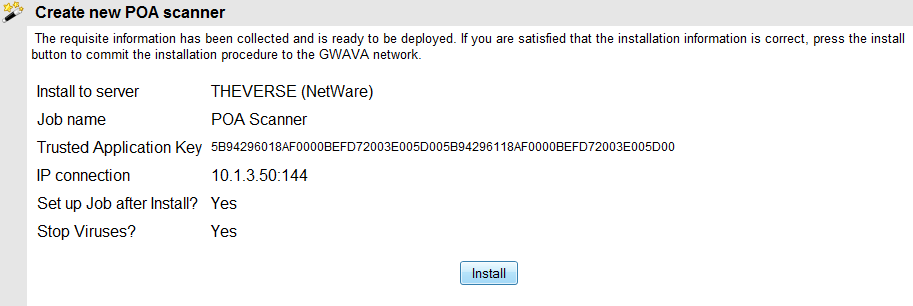
6) After the Trusted Application Key has been generated and successfully tested, give the job a name and enter the IP address and port. If no port is entered, port 143 will be assumed. If the GWAVA POA Scanner connects to the GWIA rather than the POA, the scan will be unsuccessful because the Trusted Applicaiton Key does not apply at the GWIA level. To enter a specific port, use the following context. 10.1.3.50:144. Use the appropriate IP address and port for your system.
7) Ensure that Configure Job Schedule after installing POA agent is enabled.
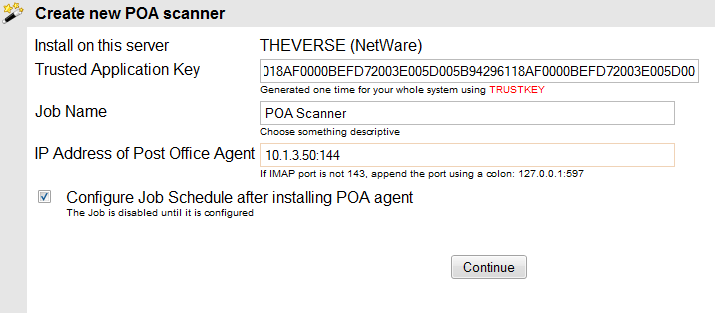
8) Click Continue if all values are correct.
9) Make sure that the scanner is NOT based on an existing scanner (example below). Doing so will import configuration for another scanner and may cause adverse effects and inadvertent mail deletion during the scanning process. This example is for scanning the post office for viruses only.
Your gwava system already has one or more scanners configured. Choose this option to share an existing scanner configuration.
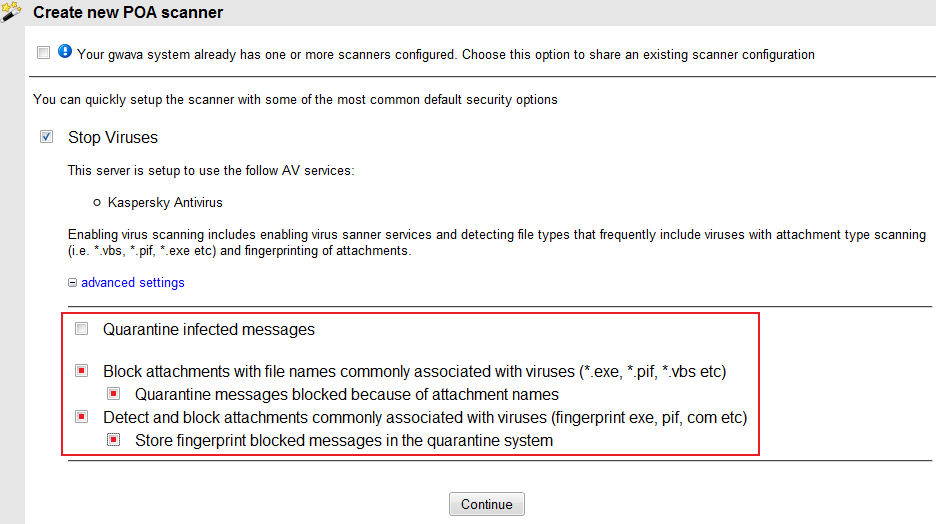
10) Verify Stop Viruses is checked.
11) CRITICAL! - Expand advanced settings. Uncheck to block attachments and fingerprinting. All four of the lower boxes should be unchecked (highlighted in red). Leaving these checked will cause the scanner to remove all email in the post office that has attachments that match its presets (there are many types). In many cases the messages will not be recoverable.
12) Verify the configuration on the next screen and click Install.
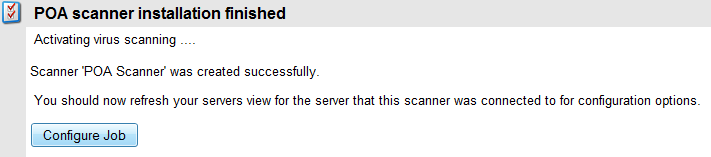
13) Wait for the install to complete and click Configure Job to open the job configuration.
Configuring the GWAVA POA Job
1) Enable the job by checking the box next to Enable Job.
2) Check Scan Users, Scan Resources, Scan Trash, and Expunge purged items.
3) Set the Job Frequency to Just Once. Set the date to today, and the time. If delete job upon complete is checked, once the job is completed this job will disappear. If left unchecked, this job will remain and can be reused at another time (recommended).
4) Set Scan Messages in date range to All days.
5) Set Scan these users to All users.
6) Set Scan these folders to All Folders.
7) Once set, click Save Changes

Verify Job is running
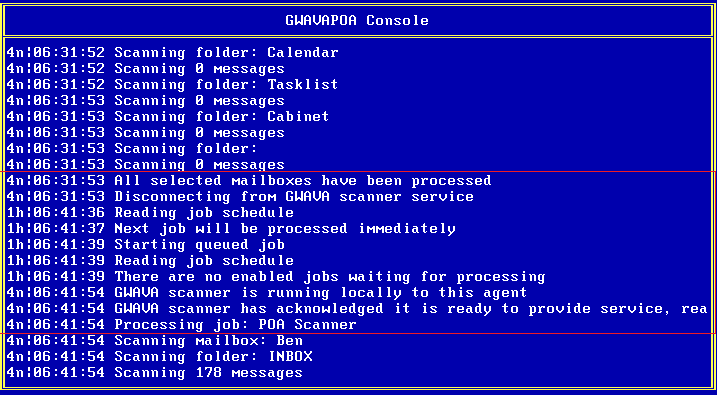
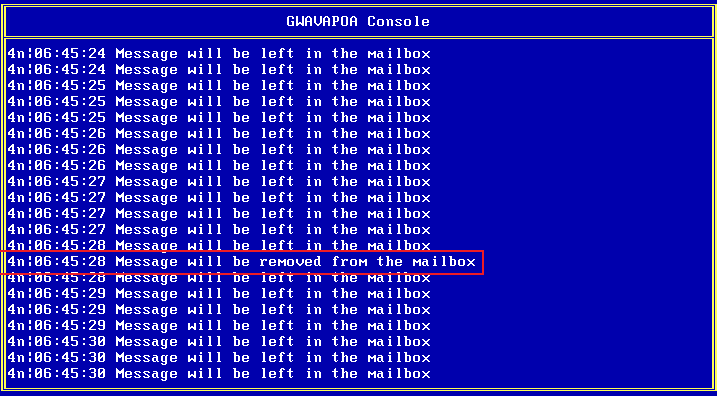
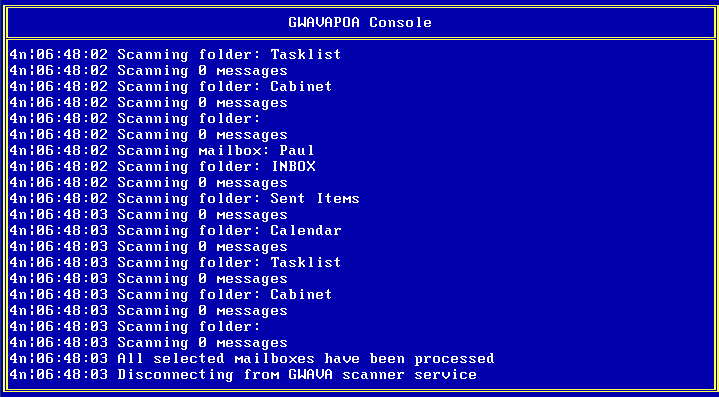
To check to see if the GWAVA POA scanner is running successfully there are several ways to check. The easiest and most detailed way is to look at the GWAVAPOA Console. Another way to check the GWAVAPOA log file. The statistics can also be checked.
- GWAVAPOA Console View (Normal Logging).
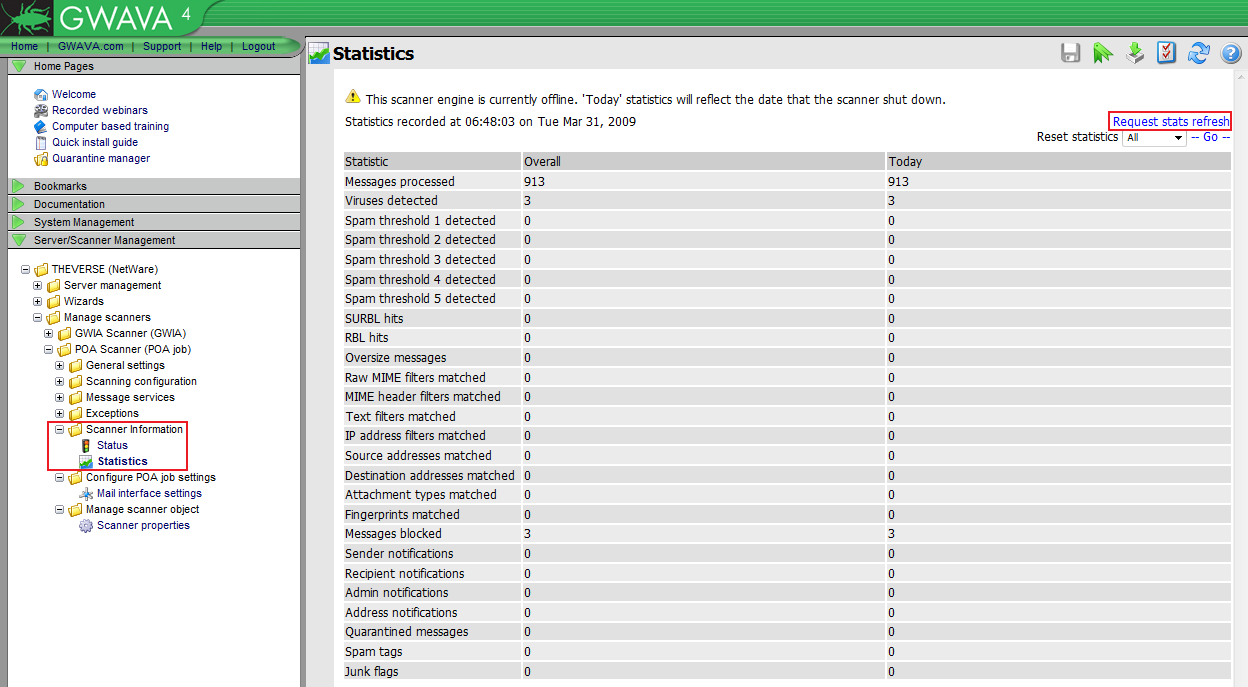
- GWAVA 4 Management Console Server/Scanner Management | POA Scanner (POA job) | Scanner Information | Statistics. Refresh the statistics.
Additional Information
This article was originally published in the GWAVA knowledgebase as article ID 1099.